How To Make A Kydex AR-15 Mag Pouch
I've been experimenting with Kydex recently and have made several different holsters. I originally started looking into home-made Kydex holsters when I was looking into a holster for my Springfield TRP with a light installed on it. There are several companies that make a good holster for that setup, Blade Tech comes to mind. The disadvantage of those holsters are the price. While I understand that quality often comes at a price, I also like an excuse to have a project to work on.
Ever since I first started assembling AR-15s, I have been enjoying tinkering with guns more and more. I've coated my 6.8 SPC build in Brownell's Aluma Hyde II, experimented with several different handguards and built a 9mm AR pistol.
 |
| Completed DIY mag pouch with Tek Lok |
I started the project with many hours of research. I read forum and blog posts from many different sites. I watched a number of YouTube videos that showed the entire process. Eventually I felt like I was ready and ordered some Kydex, foam, eyelets and Chicago screws. The first holster didn't work out too well, but I quickly started improving and ended up with a holster for the TRP with light and a IWB hoslter for a Glock 27 that I regularly use.
Recently I picked up some Tek-Loks to use with shotgun shell carriers. I ordered an extra one with the idea of making and installing it on an AR-15 magazine pouch. This was a quick project that I used some scrap Kydex for, but I think it turned out well.

To start with, I used a length of Kydex that was left over from cutting sections for holsters. I placed the magazine about where I wanted it and as you can see below I traced it with pencil. This is important as it allows you to place the magazine quickly while the Kydex is hot.

 I used another small scrap of Kydex taped to the magazine as a spacer. This will go under the area that the Tek-Lok will be attached. It will allow the spacers that the screws attached to to be recessed to prevent them from scraping against or hanging up on the magazine as it gets installed or drawn from the pouch.
  The holsters that I have made so far have been made from two separate pieces of Kydex that are sandwiched together. In order to make a smaller pouch, and because I didn't need eyelets on both sides for belt loops, I decided to fold the Kydex over the magazine. Here the magazine is again in place with the taped on spacer and the Kydex has been cut to the proper length. I measured it to allow enough space to fold the Kydex over when it is hot and still allow enough room to attach eyelets on one side to tie everything together.
For designing the magazine pouch, I wanted to be able to wear it on the left side, for a weak hand reload. In order to obtain the proper orientation, I wanted to make sure the bullets pointed to the rear as the magazine was on the belt. This would allow for the proper grip as I grab the magazine and bring it up to the gun.
 Once I was positive of the angle and direction I wanted, I moved the Kydex to the toaster oven. As it heated up, I prepared the foam and C-clamps to hold it as soon as it comes out of the oven. My main tip for the oven is to watch the Kydex very carefully. The first holster I tried, and ruined, was because I allowed the Kydex to get to hot and it started to shrink. You want the Kydex to be pliable, but not too hot. Once the Kydex is ready, it goes into the foam, the magazine is put in place and the foam is clamped down over the magazine with pouch. As you can see to the right, I left most of the magazine out of the foam to reduce the amount of pressure on the heated magazine.
 After allowing the Kydex to cool for about ten minutes I removed the C-clamps and foam. To the left you can see the rough shape of the magazine pouch. From here it is necessary to trim some of the edges away and to clean it up.
There are a number of different ways to trim the Kydex. Some of the most common are with a utility blade, scroll saw, or a belt sander. Since I have a scroll saw, that's what I decided to use.
It is a good idea to use a pencil to make a rough drawing of what you want the magazine pouch to look like when you are done. This definitely helps when you started making cuts or sanding to shape. It will allow you to end up with the end result you want, and not end up trimming away too much.
 Here is the trimmed shape of the magazine pouch. The scroll saw makes for quick work of the cutting, but it is a very rough cut as you can see here. To quickly clean up the edges I use a belt sander. This is a quick way to get some of the rougher edges off and make sure that the edges are even.
 Once the shaping is done, it is time to drill the pouch for the eyelets. The drill bit will depend on the eyelets that you have decided on. I used a 3x5 card with holes as a guide for the holes. While the hole patter wasn't as important on this pouch, it is the same pattern that I use on the holsters I have made. I have the top and bottom holes spaces for the belt loops that I use on those holsters. I added two additional eyelets to the bottom of the holster to help hold the bottom together.
  Once the holes are drilled, I use a hand tool to put them in. An Arbor Press would be preferred, but the hand tools are very inexpensive and take up very little room when stored with my Kydex supplies. I planned the holster so that the eyelets would be facing to the rear of my body on the belt. (Facing the same direction as the bullet tips.) Once the eyelets are in place, It is time to remove the tape and spacer from the magazine.
 Once the eyelets are in place, it will give you an idea of how tight the fit will be. If the fit is too tight to allow for an easy withdrawal of the magazine, I use a heat gun to relieve the edges of the Kydex to allow for some additional room. When you start to relieve areas, it is best to be very careful about how much you relieve. As the Kydex starts to warm up, it will try to go straight again. I like to heat it up a little bit, then push the magazine in and draw it out a couple times to use the high points of the magazine to start pushing out the Kydex. I heat it up enough to allow the magazine to push the Kydex out, but not enough to allow the Kydex to loose it's shape on it's own.
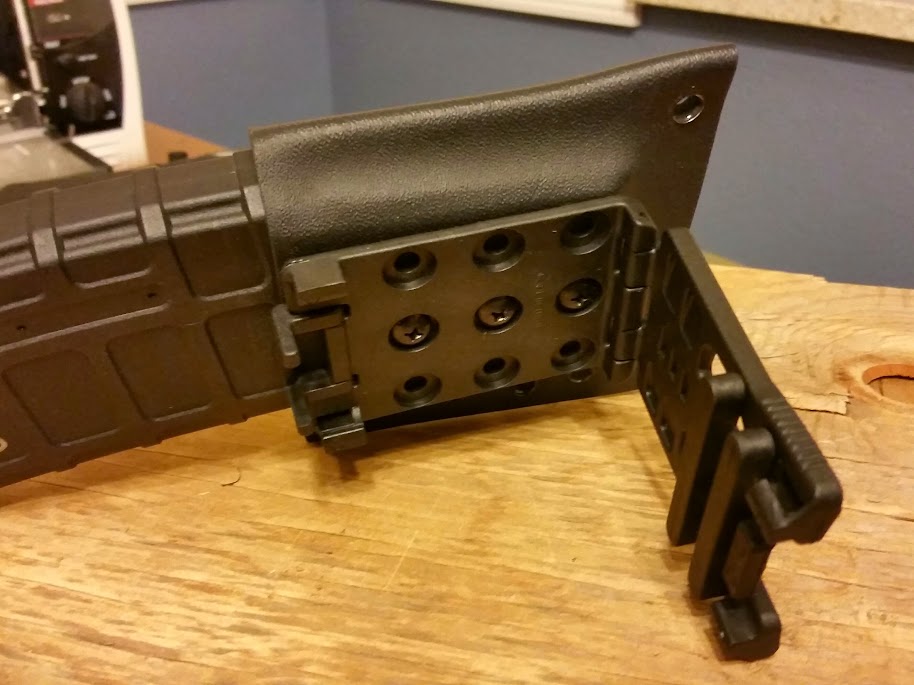
 Once I got the fit about how I wanted it, it was time to drill the holes for the Tek Lok. I aligned the Tech Lok on the holster where I wanted it and used a pencil to mark the three holes down the center of the mount. With the holes drilled I mounted the Tek Lok with the tabs oriented up and the hinge oriented down. This is not the typical way of mounting the Tek Lok, It seems that most people put it with the tabs below the belt, but I think that leaving the tabs at the top makes it easier to remove from a belt while the belt is on the body.
 With the Tek Lok mounted, it is time to test the tension of the magazine pouch. I will often do a little more tension tweaking once I can try it out on my belt. This way I can make sure that there is sufficient tension to keep the magazine in place when moving around or running, but not so much that I can't draw the magazine when I need to. To the right is the finished magazine pouch from the front. In all, the project took me about 45 minutes. It may not look quite as nice as some of the factory made pouches, but it should work just fine. The nice thing is it probably cost me about $13.00 to make and about $11.00 of that was ordering a Tek Lok. If there are any issues with it, I can always take the Tek Lok off and rebuild or replace the magazine pouch portion of it.
 I may post a picture guide later for making a Kydex holster. If you are interested in your own, hopefully this guide has helped you. I encourage you to do a lot of online research with blogs like this, forum posts and YouTube to get a solid understanding of how to form and shape the Kydex. The initial set up cost of the Kydex supplies may seem a little expensive, but once the initial supplies are purchased, the Kydex itself doesn't cost much. It is one of those projects that saves you more and more money as you continue to build additional holsters.
Do you make Kydex holsters or pouches? Let me know what you've made in the comment section below.


This blog post is very informative and interesting related to magazine Pouches
ReplyDelete. Keep it up for your readers.
This article is very informative and interesting Ballistic Plates. This is related to my interest. I got a lot of information from this site. Keep it up for your readers
ReplyDeleteThis type of content is very informative and interesting Weapon Accessories. I got a lot of information from this site. Keep it up for your readers.
ReplyDelete